
DIY Boutonniere — Wedding Wednesday
Disclosure: I am NOT a professional, nor have I ever claimed to be one. I’m sure there are many ways to make a boutonniere, and that some believe you should only have a professional do your flowers. That’s fine if you believe that, but that’s not always an option.
Did you know that the average wedding in America costs $28,427? Um…that’s more than many people make in a year. We spent so much less on our wedding, and I still felt bad. However, just because you have a budget for your wedding doesn’t mean you have to sacrifice quality.
Starting today, Wednesdays are officially “Wedding Wednesday” until I run out of ideas. I will be sharing lots of different tips, ideas, and tutorials on how to have a wedding on a budget, as well as some random posts about weddings in general. If you want to guest post ever, let me know!
Today, I’m going to talk about flowers.
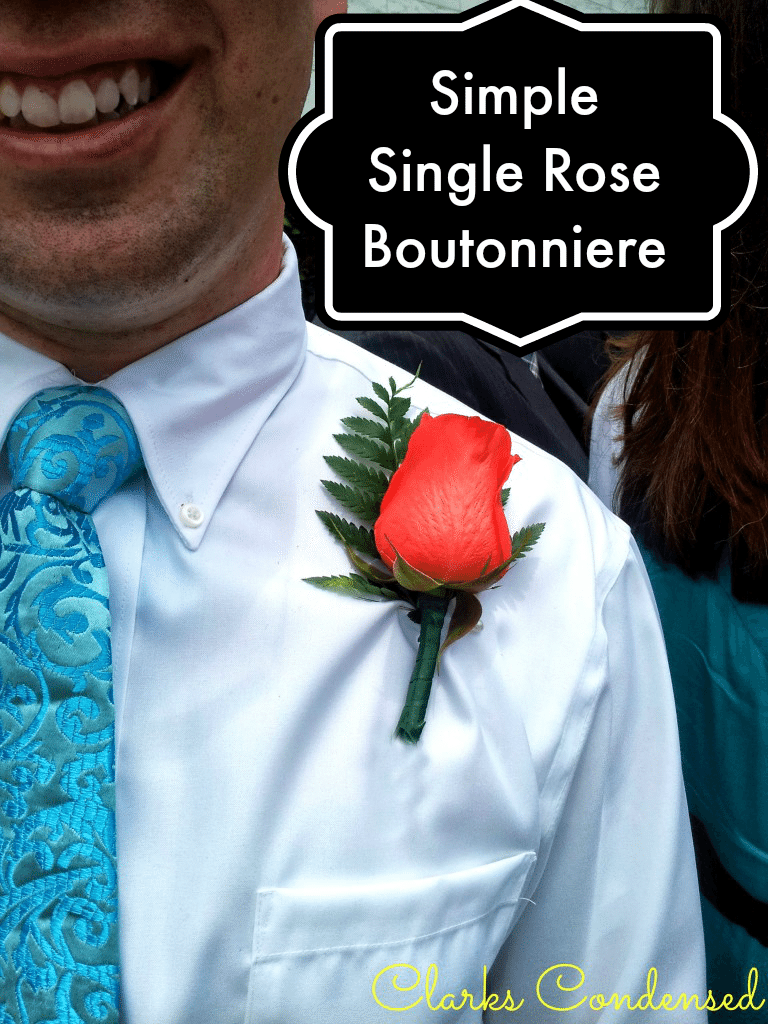
In the link I referenced above, the average cost of flowers is $2,000. I know flowers can be expensive, but seriously? Wow. We were lucky with our wedding, because a family friend did our flowers for very a very inexpensive price. As many of you know, my sister-in-law recently got married. When we arrived in North Carolina, we saw 200 beautiful roses, and soon found out that all the flower arrangements, bouquets, and boutonniere would be homemade. I was super excited to see how this was done. And, surprisingly, it wasn’t too hard. So today, I’m going to teach you how to make a simple, homemade boutonniere (and I’m planning to do a bouquet post in the future as well.)
Materials Needed
- Flower of choice (we used roses, obviously)
- Greenery, baby’s breath, or other small flowers
- Floral Wire
- Floral Tape
- Floral Pin (see picture in tutorial for what this looks like)
Step One:

Cut the flower so there is about 2 to 2 1/2 inches of stem left. It’s always best to have to cut off additional stem, then realize it’s too short. Also trim off any thorns that are there. If there are petals on the outside that are starting to wilt, keep those on until the Boutonniere is ready to be worn, as it will prevent other petals from wilting. Handle with caution, as they are very delicate after you cut the stem.
Step Two:

Take a piece of the floral wire (about five inches in length — trim if you need to; we got three pieces out of one piece.) Insert the wire in the stem of the flower (in the side you want to face the person wearing it) and push it up until it feels secure. Try and get the wire as close to where the stem and petals meet as possible. Here is a better look:

Step Three:

Take the greenery or other backing and put on the back of the flower, making sure the stem is very close to the flower stem. Take the floral tape and starting at the base of the flower, wrap the tape around the stem, and make your way down until you get to the end of the stem.
Step Four:

Cut the tape off, and trim the stem if necessary. Bend the end of the stem up into a loop, and tape to the rest of the stem. Make sure the loop is placed in a way that it won’t visible when pinned on a shirt. Just for a visual, this photo will show what the loop looks like (it wasn’t in the correct place on this Boutonniere.)
Finally . . .

Put the pin in the flower, just so you don’t accidentally forget the pins at home. Keep in a damp box and refrigerated until ready for use. I wouldn’t recommend making them too far in advance. Make sure to take off wilted flowers immediately before wearing.
How to Pin:
I know a lot of people complain about how hard it is to put a boutonniere on, myself included. However, I discovered a simple way to do it, that will make sure the flower doesn’t fall over. Simply take the pin and insert it into the shirt (making sure not to poke the person!) and then bring it back out. Take the flower, and push the pin in between the space between the floral wire and the stem, and then push back through the shirt. Hopefully this makes sense. If not, I’ll make a tutorial soon!


So easy – but no one thinks of it… Great job and thanks for sharing.
Weddings can be so expensive! Great idea for saving money!
Thank you! They truly can be so pricey!
What a great tutorial! How cool that you guys made all of them for the wedding. Great tip on pinning them on too!
Thanks! 🙂 That was one of the funnest parts 😉
How cute! What a great idea for a series. I can’t that total for the flowers.
I know, right? That amount is seriously about half of what my wedding cost!
And thanks! I hope I can come up with enough posts. If you ever want to guest post something, let me know 😉
YESSS!!! I’m so excited about your new “Wedding Wednesday” 😀 I’m planning to get married next year so this will be fun! I know I will learn a lot with you 🙂 Thanks so much for sharing this, I will definitely make these boutineers! I will pin it right away
I didn’t know that! yay! I hope you will follow along 🙂