
PicMonkey Made Easy: Remove Shadows
PicMonkey is very affordable — even the free version has awesome features. If you want to buy Royale though, head over here. It is $4.99 a month, or $33 a year.
There’s a lot of things that can ruin a good picture. And one of the worst culprits, at least in my opinion, are shadows.
I know there are so many ways to avoid getting shadows, but for amateur photographers like me…it can be hard. The other day, I feel like I spent 15 minutes trying to make sure one of my photos didn’t have a shadow, and guess what — it still did. Luckily for those of us who can’t avoid the shadows can use PicMonkey to lessen the shadow and make the photo look better.

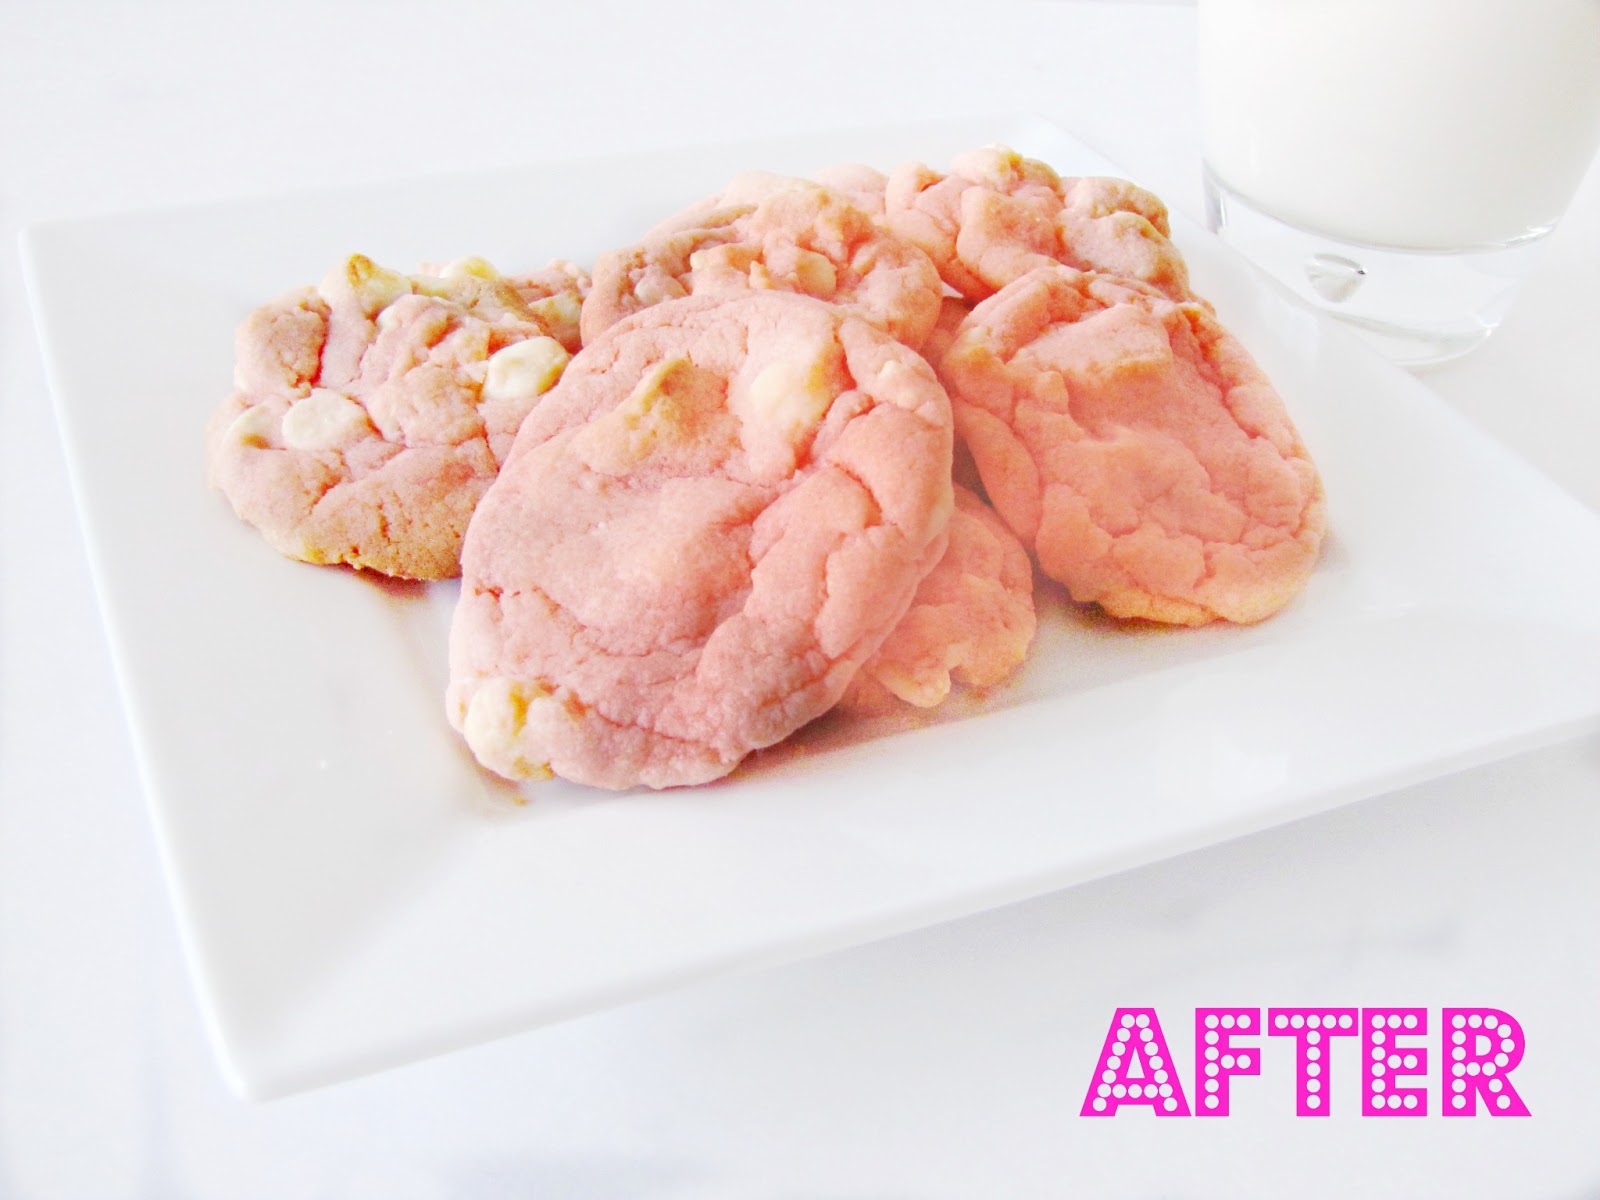
Take this photo for instance, from my strawberry banana pudding cookies. Obviously, it’s darker to begin with, but there are some very prominent shadows:
 .
.So I do some basic touch ups (I’ll go into more details about these another time) using the following tools:
1. Go to basic edits
2. Select auto adjust
3. Then click the “Exposure” tab
4. Select brightness — adjust accordingly (for this photo I went up to about 15 — it will just depend on how bright the photo already is)
5. Then select highlights — adjust accordingly (same with the brightness, this will just depend on your photo. For this one, I just upped it slightly to 5.)
6. Press apply
7. Select the “Colors” tab
8. Adjust saturation slightly (this isn’t always necessary, so use discretion. Sometimes it makes the photo look super unnatural. For this one, however, I put it up to 13.)
9. Press apply
After applying these edits, this is what the photo then looked like. Obviously, it already looks a lot better, but there are still quite a few shadows — under the plate, in the milk, over by the cookies on the left.

That’s where we put on the finishing touches. For this, we are going to go to the “touch up” section of PicMonkey (the lipstick tube.)
1. Navigate to highlights
2. Using the eye dropped, select the brightest color that matches the area that is shadowed. In this case, I “stole” the white from the upper left of the milk class.
3. Using the cursor, fill in all the areas that you want to eliminate the shadow from. You may end up having to apply the color to all areas that are the same color, just so it doesn’t look unnatural. For this photo, I pretty much applied it to everything that was white, because there were lots of shadows everywhere, and if I only applied it to the shadows, it looked splotchy.
4. Press apply, and then select highlights again (if you have another area with shadows, that is a different color.) You must do this, or else everything you just did will turn to the color of the next highlight that you do — make sense?
5. Use the dropper to select the next color (in this case, the pink of the cookie) and apply to all necessary areas. Press apply.
6. If you still want to brighten the colors (and I did for the cookie), select blush boost, which is under the touch up section still. Because it was a pink cookie, I found a shade that was closest to the original pink, and then I just brushed over all the cookies. It didn’t change the color, it just enhanced it a little bit, and eliminated even more of the shadows.
And here is the final product! The original shadows are almost non-existent.
And in case looking at these photos made you hungry, be sure to check out the recipe for the star of the pictures. You won’t regret it, I promise!
Obviously, all pictures are different, so you’ll have to play around to get the exact effect you want, but if you follow the general steps above, you’ll be getting rid of unwanted shadows in no time.

What about shadows on faces? Help, please! Thank you!
This tutorial was great and it works! I love PicMonkey and I use it to edit all my shop and blog pics, now, using your method, my pictures look even better! Thank you so much!
Thank you, Denae! I’m glad it helps your pictures look even better 🙂
Thanks so much! I’m an avid PicMonkey user, but I didn’t know about this technique. I tried it & it worked. Thank you for sharing your awesome knowledge.
Warmly, Michelle
Faith, Trust & Pixie Dust
PS – Your cookies look great. You may want to put a link in your post that can take us to your recipe. {The longer visitors stay, the better – right?}
I’m so glad you found it helpful!
What a great post! Thanks so much for sharing this, Katie! 🙂
Great tip!!! Thanks.