
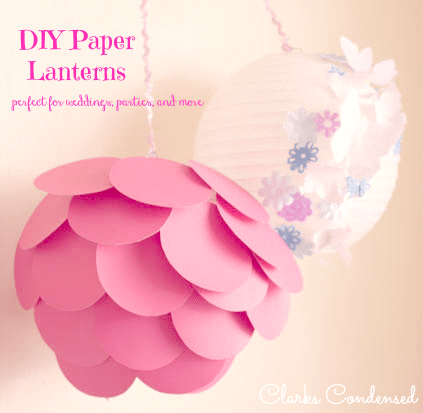
DIY Paper Lanterns
Today I am excited to have Anne Dee from wedding star. When she asked if she could do a guest post on DIY Paper Lanterns, I couldn’t say no! This is something I was really wanting to feature on Wedding Wednesday, but I wasn’t really wanting to actually go to the effort of making them. However, they look super simple, and Anne gives some great tips! And, if anyone else has a great idea that they think would be an awesome contribution to wedding Wednesday, just let me know! Enjoy 🙂
No matter what color scheme or theme you’ve chosen for your special day there is nothing quite like adding a personal touch to your wedding décor and there is one very simple (and fun!) way to achieve this with paper lanterns. Before you start protesting that you’re ‘not arty’ bear with me a moment because creating your very own lanterns for your reception is so easy even a child could do it. In fact – that’s quite a good idea and if you happen to have a child handy, why not set them to work on the kitchen table right away!
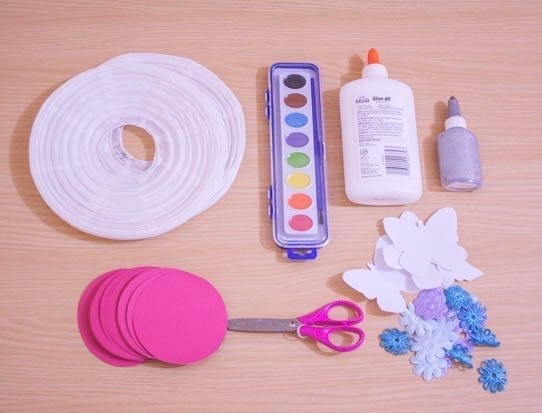
Here’s what you’ll need to make your own hand decorated paper lanterns:
- A pack of paper lanterns in the color of your choice
- Watercolor (if desired)
- Ribbons
- Embellishments
- Glue
- Scissors
Step One:
First of all, take a paper lantern and pop it carefully into shape so it’s stretched across the wire frame.
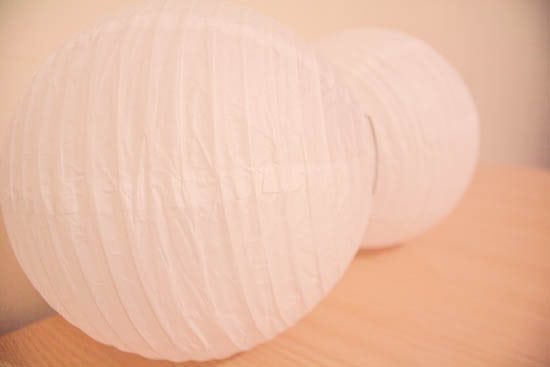
Optional: You can take your paints and add some color. You could paint thin stripes using the wire ‘ribs’ for a guide, paint broader stripes in between the wires, or add little polka dots or hearts. You could even splatter or flick paint at the lantern, Jackson Pollack style: you’re the artist – the choice is yours.
Step Two:
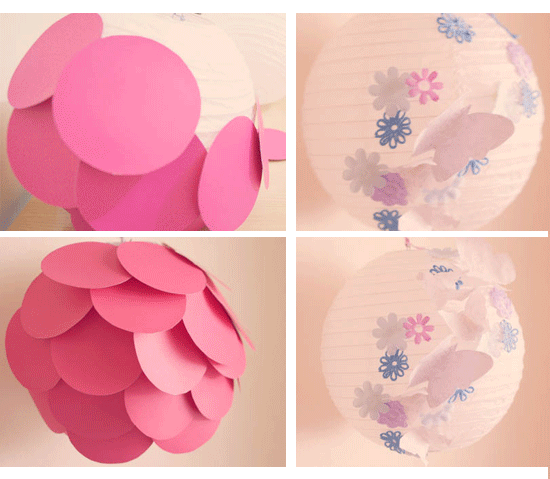
Take your embellishments that you want to stick on to the lantern. Paint a thin layer of glue on the back of each cut and place each embellishment gently onto the lantern and wait until dry. You may want to add a topcoat so that they are held firmly in place and the edges doesn’t curl.
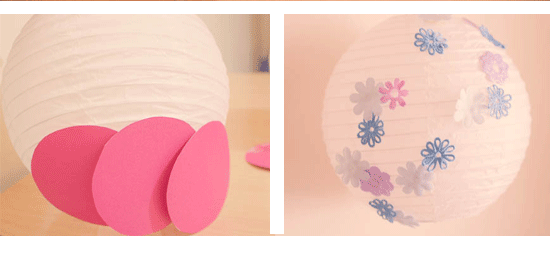
Step Three:
This is where you can let your imagination run away with you. If your ethos is ‘more is more’ this is the part where you get to go wild with the sequins or glitter. If your paper lantern looks pretty perfect, as it is however perhaps you’d just like to tie some ribbons or streamers to the bottom of the wire frame so they dangle and twirl in the breeze.
So there you have it in just three easy steps, party-perfect, hand-embellished paper lanterns can be yours. And the best part is, not only will they add a unique touch to your wedding, but they make wonderful keepsakes afterwards. Share them with close friends or family or create a feature in your own home with them.
A Few Ideas:
Haven’t picked your wedding theme yet or not sure how to decorate your paper lantern? Here are a few ideas:
Nautical theme weddings will look fab when decorated with red, blue and white paper lanterns with retro sailing boats cut from a child’s curtain fabric glued to them.
For a romantic touch, cut up some floral fabric and adorn your lanterns with sprays of flowers – large clusters work well, such as rose print material.
Have a particular color scheme in mind? Why not glue ribbons in coordinating shades around the lanterns for a striped effect?
Little paper die cut flowers in bright colors will look adorable scattered across white paper lanterns.
The crafty choices are endless so why not share your ideas in the comments below.
Anne Dee is a blogger at wedding star, a designer of wedding accessories, and event organizer. She loves to write wedding tips, DIY tutorials and contribute it to various wedding blogs. Follow Anne on Twitter @AnneDee89.

Hi Hezzi,
This is very easy to craft, you can finish this in just an hour. 🙂
Love it! They look so great!
I wanted to make these for my wedding but I just didn’t have the time. You did a great job with them though!